Wednesday, March 30, 2011

Raise it up!

Raise it up!

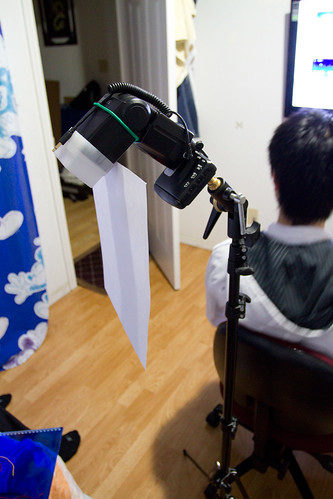
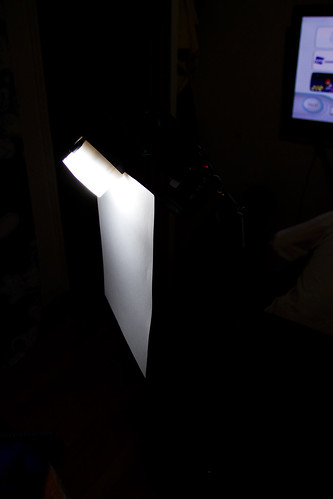
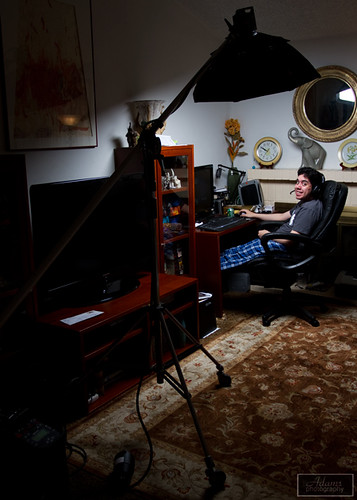
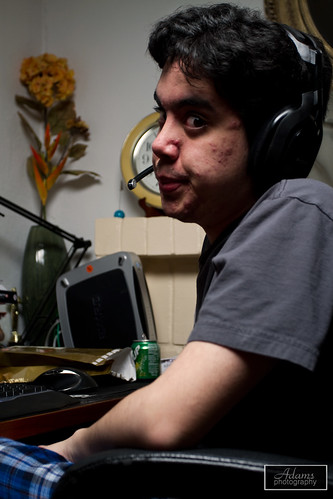
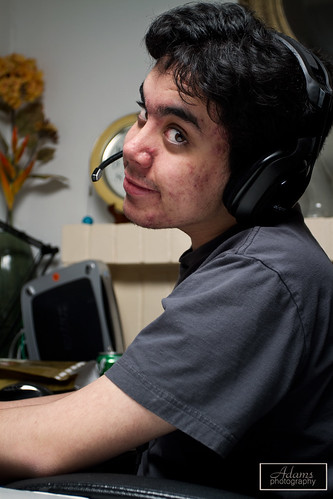
With flash these days some people ask how the heck do you actually get the light to not look so harsh? My answer sometimes is I am changing the angle of the light by making it really high. How high? Sometimes 20 feet high, or at least an angle that looks like it could of been 20 feet high. The reason for that how the light looks from that location because it might resemble a ceiling light, the sun, or if slightly above the floor its like a flash light in someones hand.

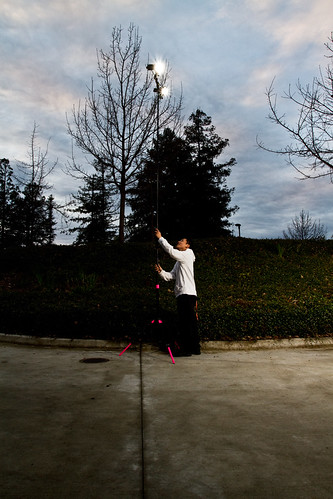
With that said, move your flash around or in this case, raise it up! Few things to take caution though is how high the stand is in the air. When it get to be a certain height just a small amount of wind speed can make your flash unit take a dive down south. To make sure that does not happen buy either a really strong sturdy steel stand that can hold allot of weight because that stand will in turn out to be a heavier than a regular aluminium stand. Thus weighting down your flash because you are overkilling the stability with that type of stand. Most of the time this isn't enough, so what needs to be done is you need to weigh it down. This can be accomplished from anything like your camera bag, a exercise weight, or a sand bag, or improvise but generally get a good amount that wont allow the stand to flex and rock too much in the wind. If you REALLY do not have any resources to be ingenious then grab a friend to hold that stand, at least he can correct the stand if it does start to deviate.

Give it a try for you next shoot if you have not done so already by using a decently tall light stand (at least 8ft and taller).

Thursday, March 24, 2011

The Use of a Simple 8x11 Sheet of Paper to Fill in Shadows

Shot With 8x11 Paper

Hey everyone! Today's post is going to be something that allot of new photographers who get into photography often times forget to think about and that is fill lighting. Here I will be using a 580exII triggered manually using a Pocket Wizzard system along with a Omni Bounce and a plain sheet of white paper for light modifiers. This combination is best used indoors or in situations where wind is not going to bother you, if that is the case kick the paper up to a piece of white foam board or something similar.

Fill lighting is any kind of lighting that isn't being done by your main source of light. There are so many ways a photographer can fill in shadows and here is how just a simple white sheet of paper can accomplish this! The reason I used the white sheet of paper is because it was accessible for one, its easy to mount with just a piece of office tape, and if you want to fold or manipulate the paper it is easy to do because of how light weight the paper is along with how stiff the folds can be.

The Set Up Without Flash for 8x11 Paper

Using a omni bounce as my main light it makes my 580ex act like it is a bare bulb flash unit. The paper slightly being behind the flash is acting as fill and isnt at an angle that reflects light in one area instead has a gradual effect if you notice on the paper. For other effects of using this method I could always rig up another piece of paper some how and change the angles of them since they are after all white reflectors.

The Set Up with Flash 8x11 Paper

The look without the paper is really not that attractive to me. The reason is because my subjects eyes are in shadow because I have my light so high up in the air in relation to my subjects face. Again to kill that look, that is where the simple piece of paper comes in!

Shot Without 8x11 Paper

The end result is an elimination of the shadows on the face, a little more light on the clothes and softened the shadow edges on the back wall.

Shot With 8x11 Paper

Give it a try! It really does help if you hate pesky shadows!

Thursday, March 17, 2011

The use of a Super Boom and a Small Octa.

Hey everyone! Long time since I posted here! This is greatly due to the advancements I have been making to have a legitimate photography business and....I post random photographs on Tumblr and they explain themselves where this blog I go into more detail.

This time I will be talking about my smaller 3 foot Octabank and how I use it. This model is made by Photoflex; their offerings are decent in quality in quality and their modifiers are  reasonable for the price. Even their MSRP are great for these modifiers so go and try them out! These things can be had also online for cheap if 2nd hand, but really for a new modifier is worth it since Photoflex modifiers get really wrinkled too when packed up many times!

Octa set up

The neat thing about an Octa is that you really cant go wrong with a photograph. It offers clean even light because of the shape, its a roundish box without hard right angles to deal with. Unlike squares or rectangles that generally have a large hot spot in the middle and an octa minimizes that with the shape and layers of diffusion. I still use them allot, but they are  tricky to use head on, so feather the light! There is however still a hotspot on a octa, but not as strong as something like a rectangle so dont think you are off the hook for that! This is accomplished by two panels of diffusion along with the circular shape. The one outside is the 2nd layer you can see while insider theres an inner layer that is graduated to even out the light. The inside of the new Photoflex Octabanks have Velcro inside of them to use inserts of silver or gold! that can creat a more specular source that is intense if using silver, or intense and warm using gold You can mix and match to what you like! I also sometimes shoot without the front outer diffusion layer to turn it into a large white reflector! Pretty neat trick! It can be similar is performance to a beauty dish, but it sure isnt one!

To effectively use my Octa I position it to use it as a main light. Gernerally for me its used slightly abolve the head to cast down a shadow on the face:

Octa above

To minimize the effect I use a large reflector under the subject or to the side to evenly fill in the shadows since the octa is throwing even light to begin with. This is the result:

Octa with Fill

Thanks to my brother for helping out! Go try and use an octabank and see what you can do with it!